honda305 Home honda305 Auctions honda305 Gallery honda305 Forum


honda305.com Forum

Login
□ Search
□ FAQ 
□ 
Vintage Honda Owners,
Restorers, Riders and
Admirers

1964 Honda Dream CA78 Rebuild-storation

Want to keep a Restoration Log? Post it here! You can include photos. Suggested format: One Restoration per Thread; then keep adding your updates to the same thread...
User avatar
Bob750
honda305.com Member
Posts: 233
Joined: Wed Jun 27, 2012 6:41 pm
Location: Long Beach, CA

Post by Bob750 » Sat Feb 01, 2014 2:55 pm

Okay, so things are coming together rather well. I didn't break any bike or person parts putting the engine in all by myself. Now, as I'm finishing the reassembly, I have a few questions to put out there.

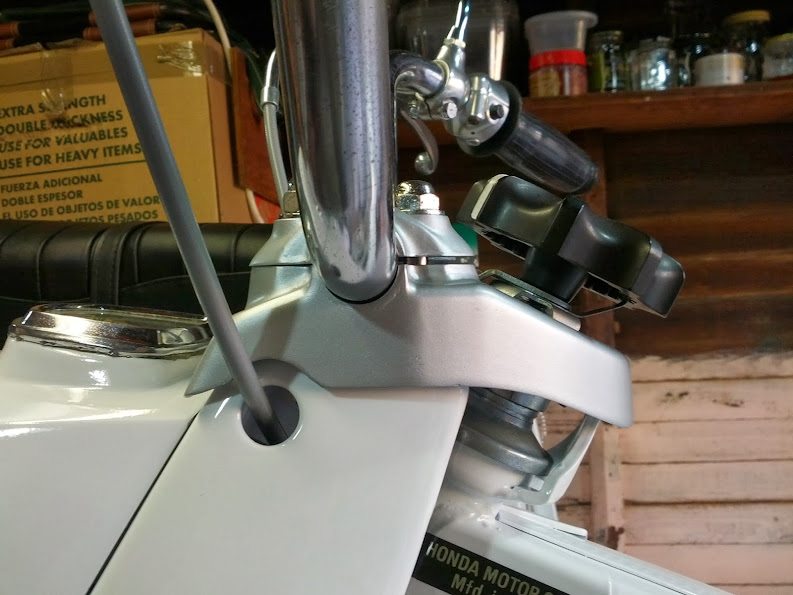
1. Is this the proper place for the gap when setting the handlebar? If it's similar to the way the front axle clamps are on my CB 750, there is one right way and two wrong ways to do it--gap forward, gap aft, or gap even. In the case of the 750, gap aft is correct, and it's helpful that the clamp pieces are embossed with an F to properly orient the clamp with the correct end Forward.
Image

2. What is the proper orientation of the swingarm chain protector rubber? There is a thin "wall" along one side. Does that go inboard, as installed in my photo, or outboard? If it's inboard, does it go inside the chain case (as in my photo) or outside?
EDIT Feb 4, 2014: I figured out, after some fiddling, that the rubber actually has two different radius bends. I had removed it and connected the two ends together and peered through it. It was then that I saw the not-equal size of each bend. It became apparent that the two bends should go around corresponding different radius parts of the bike. Sure enough the swingarm cross-member is nearly twice the diameter of the swingarm pivot tube in the frame. Once I realized the front-to-back error I had made, and concluding that it would not "want" to be in place with the gap facing upward, there is only one way that this piece can go. So I reinserted the rubber correctly and proceeded with reassembly. Sorry I forgot to photograph my orientation correction...
Image

3.WTF?! How the hell does one get the rubber into the slot with the wires running through it? I soaked the rubber in glycerin to make it softer. It doesn't look super, but it's not in bad shape. (Anyone know where to get a fresh one? I've searched but found none.) I've spritzed it with silicone lube and it's smooth & slick but still won't fit into the panel with the wires going through it. I've about given up, and I'm fashioning another solution, pictures to follow later. Right now the only possibility I see is to install the rubber in the panel and then feed the wires through it one at a time, which I'm not even sure will work. Is that the solution?
Image
Last edited by Bob750 on Tue Feb 04, 2014 10:31 am, edited 1 time in total.
Mine: '74 CB750 K4 -- Hers: '64 CA78
Had: '75 CB550 K, '79 CT90

User avatar
Bob750
honda305.com Member
Posts: 233
Joined: Wed Jun 27, 2012 6:41 pm
Location: Long Beach, CA

Post by Bob750 » Tue Feb 04, 2014 12:11 am

Okay, so I figured out the swingarm protector, I had it wrong. Still wanna know about the handlebar mounting and the air filter cover slot. But I can fiddle with those later, I'm getting ready to start it up!

Today I put on the lower hardware and pipes and hooked up the battery. The electrics all tested good except the tail light. I used my multi-tester to determine it was just a lack of ground since the painting. A little scraping of some paint and it was all better. Ran the starter a few times to circulate some oil, and get it ready to start.

The fuel tank has just finished curing 96 hours after the POR-15 treatment for a small seep it had at the left rear mount. Tomorrow I'll get some of that tasty Chevron 91 octane and see if it'll run.

Image

Wish me luck!!! (just in case I need it...)
Mine: '74 CB750 K4 -- Hers: '64 CA78
Had: '75 CB550 K, '79 CT90

e3steve
h305 Moderator
Posts: 2601
Joined: Fri Oct 31, 2003 1:38 pm
Location: Mallorca, Spain & Warsash, UK

Post by e3steve » Tue Feb 04, 2014 11:46 am

Looking very sweet, Bob!

And "good luck"!!

User avatar
sarals
honda305.com Member
Posts: 1014
Joined: Mon Jun 25, 2012 9:19 pm
Location: Monterey Peninsula, California

Post by sarals » Tue Feb 04, 2014 10:11 pm

Oh my, that bike is beautiful! It looks just immaculate in that white paint. I know it's going to run as good as it looks - right away.

I'd really be afraid to roll it outside!
1965 CB77 305 Super Hawk
1989 NT650 Hawk GT
1981 Yamaha XJ550 Seca

User avatar
Bob750
honda305.com Member
Posts: 233
Joined: Wed Jun 27, 2012 6:41 pm
Location: Long Beach, CA

Post by Bob750 » Wed Feb 05, 2014 12:40 am

Thank you Steve and Sara!

Well, today went pretty well, sort of.

I hooked up the fuel lines, put in some gas, turned the key and pushed the button.

Vroooom! First attempt! Problem though. The rpm went way up, so I shut it off immediately. I backed out the idle screw in case that was doing it. No change. It kept happening. So I pulled the carb and saw:
Image
It's not stuck! It's just lifted by the cable. So I removed it, and messed with the cable and routing and put it back and it slipped down some, but not all the way, so then it looked like:
Image
Nothing I could do would let it go lower; the adjustment on the cable by the steering lock is adjusted all the way in. I tried running it again but the same thing happened. So, in a trouble isolation move, I disconnected the throttle cable from the handlebar attach point. When I let it go, I heard the "thop" of the slide landing on the floor on the carb body. Aha! So I hit the starter and it wouldn't start until I increased the idle adjustment. Once I found the right point, it idled beautifully!

So it seems I have a defective cable that is too short!? I bought it from Retrobikes (part 17910-271-000) with some other items and the brake cable which works nicely. So there's that.

Second problem: While I was happily idling the bike, I noticed a small puddle of oil on the starter just below the left exhaust outlet. I have a leak at the cylinder head Gasket! Grrr. It appears to seep out just to the left of the cam chain tensioner and pool there. It either runs around to drip off the front of the cooling fins to the starter, or it's seeping from more than one area on the left side. Of course, it stops when the engine is not running. I do not like it! Grrr. Here are the leak pics.
Image
Image
Image

The only other oil leak is a drip every-two-days I found a day or so after I put oil in the motor. It comes from the oil pump gasket. Oh and the same level of seepage comes from the special nut with the special washer, which I guess isn't working. I've tightened the oil pump and special fastener a little but it still seeps.
Image

So I have these problems I'm not sure how best to solve:
Head gasket seep
Oil pump seal seep
that other nut/washer seep
Throttle cable issue

Any advice on tackling these? I imagine I'll have to drop the motor. Should I re-torque the head nuts, or remove the head and add a little gasket goo? (There is no sealant anywhere on this engine except for the case halves.)
Anyone recommend where to get the best throttle cable?

Any help is appreciated!
Mine: '74 CB750 K4 -- Hers: '64 CA78
Had: '75 CB550 K, '79 CT90

User avatar
G-Man
honda305.com Member
Posts: 5678
Joined: Wed Mar 25, 2009 5:17 pm
Location: Derby, UK
Contact:

Post by G-Man » Wed Feb 05, 2014 3:23 am

Bob

You might have the same problem that Sara had with her CB77. The dowels on the front cylinder studs may be bottoming out and stopping the gasket compressing. This may be because the head or barrel has been skimmed at some time. Shortening the dowels might help.

Your little M6 bolt next to the oil pump should have a blind nut with a copper washer underneath. You'll find that in your meticulous pars system. Not sure about the other drips on the oil pump. You may have to wipe that down and watch the area as you run the motor again.

As for the carb - you may be able to peel a few turns of the outer cable to effectively give you more inner. Pull off the ferrule. Carefully cut through the plastic outer and you will see that the cable is just a long coil of square section wire. Cut some off and re-seat the ferrule.

Looking good!


G
'60 C77 '60 C72 '62 C72 Dream '63 CL72
'61 CB72 '64 CB77 '65 CB160
'66 Matchless 350 '67 CL77
'67 S90 '77 CB400F

LOUD MOUSE
honda305.com Member
Posts: 7817
Joined: Mon Aug 15, 2005 8:23 am
Location: KERRVILLE, TEXAS

Post by LOUD MOUSE » Wed Feb 05, 2014 8:29 am

I also noticed the missing blind nut but here in the states we had/have aluminum washers at that location.
Looks like he may have the aluminum washer installed but incorrect type nut. .....lm
G-Man wrote:Bob

You might have the same problem that Sara had with her CB77. The dowels on the front cylinder studs may be bottoming out and stopping the gasket compressing. This may be because the head or barrel has been skimmed at some time. Shortening the dowels might help.

Your little M6 bolt next to the oil pump should have a blind nut with a copper washer underneath. You'll find that in your meticulous pars system. Not sure about the other drips on the oil pump. You may have to wipe that down and watch the area as you run the motor again.

As for the carb - you may be able to peel a few turns of the outer cable to effectively give you more inner. Pull off the ferrule. Carefully cut through the plastic outer and you will see that the cable is just a long coil of square section wire. Cut some off and re-seat the ferrule.

Looking good!


G

Post Reply


CB-77 | CYP-77 | Road Test | Riding Log | Literature | Zen | Marketplace | VJ Survey | Links | Home